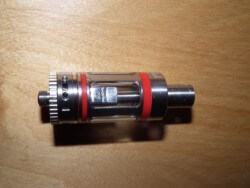
Kangertech SubTank Mini Review from eCig Directory UKThe SubTank Mini is the middle sized version of the Sub Tank family which is slightly larger than the Nano with a 3ml capacity but much smaller than the new Sub Tank Plus which has a whopping 7.0ml capacity! The only difference is the size and they all take the same replacement heads.
It can hold 4.5ml of favourite e-Liquid and the base is 22cm diameter which means it will fit nicely with most MOD boxes and batteries such as the Innokin MVP 3.0. It contains an adjustable airflow control at the base with 4 positions which I will explain about later in this article.
What is in the box?
The following is included inside:
- 1 x SUB TANK Mini
- 1 x OCC 0.5 Sub Ohm Head with a range of 15-30 wattage
- 1 x OCC 1.2 Ohm Head with a range of 12-25 wattage
- 2 x RBA 0.5 Ohm with a 30W coil
- 1 x Japanese Cotton Pad
- 1 x Mini RBA
- 1 x Spare Glass Pyrex Tube
- 1 x Mini Screw Driver
- 2 x Screws (for the RBA Head)
- 1 x User Manual
First impression and design
It comes in a lovely red and black box, upon opening it up, it looks stylish with a stainless steel finish and red seals. The seals can now be customised to your favourite colour and these can be purchased from a range of vape shops online. It is quite weighty and really does feel well built and doesn’t feel it would break easily. It lots of replacement parts, spare pyrex glass and Japanese cotton for rebuilding and even a screwdriver.
Vaping experience and thoughts
My previous setup was a Innokin MVP 2.0 and I was using iClear 16 heads, although I was quite happy with this setup I was easer to experience Sub Ohm vaping and see how much higher wattage settings would change my opinion. I decided to purchase the Innokin MVP 3.0 (click link for a review) battery to go with it as I needed something that would deliver at least 15-20 watts for this tank to work properly.
I screwed on the 0.5 Sub Ohm OCC head and primed it with some e-Liquid (otherwise you will end up with a dry hit and damage the cotton). I filled the tank up with some of my Apple flavoured e-Liquid (one of my favourites) and set the MVP3.0 to around 15 watts. The first thing I noticed was how powerful the vapour was and the flavour enhancement was incredible. The flavour was much more refreshment and I could clearly pin point the flavour that my e-Liquid was supposed to be. I increased the wattage and noticed that it produced more flavour and the vape was getting much hotter as well. I have now started to use 80% VG and 20% PG in my e-Liquid and this produces huge clouds of vapour!
The drip tip is removable and takes a while to get used to the wide metal mouth piece but you can get a really vape from it and it is easy to clean.
I find that this tank runs great at around 15-22 watts without any dry burning at all and it always delivers a great vape. It really does burn a lot of e-Liquid if you are using this throughout the day.
‘Running the Sub Tank Mini at 20-25 watts on the Innokin MVP 3.0 gives me a very satisfying vaping experience!”
I really like the included OCC heads as all you need to do is prime them with a bit of e-Liquid before using them and they are ready to use. I have found the heads last anywhere between a week and two weeks without much flavour diminishing over time. There are videos on YouTube to explain how to re-wick them but they can be purchased for as little as £10 for 5 of them if you shop around.
The included rebuild-able head (RBA) gives you the opportunity to build your own coils and re-wick them but I haven’t felt the need to do this yet. A spare coil is also included in the box as well but you will probably want to buy some Kanthal wire as a backup. There is even a miniature screwdriver included so you can start fitting your own coils straight away. Once again there are many YouTube videos available on how to rebuild the SubTank.
Summary
‘A really impressive tank with fantastic design and build quality for less than £30’.
I have tried many of the flavours I had been using in my old clearomizers and the difference is staggering, they all taste so much better and definitely give a different experience to vaping. I like the fact that I can adjust the airflow depending on what type of vape I want, this can affect the amount of heat delivered in the vapour and how much you have to drag for delivery.
Resources
Ellis from YouTube channel Destiny Vapours has provided an excellent video review and how to build your RBA.